Getting Started With Android Framework and Native Code Support - From zero knowledge to be a Developer Part One
 |
A beginner-friendly guide to getting started with Android NDK
Getting a good tutorial is easy nowadays. but finding a proper, beginner-friendly tutorial and point-to-point explaining tutorial is not easy to find. From my side, I do not offer you the best tutorial to follow.
It may contain an error, inaccurate information but I can assure you that, I will try my best to help you get started with Android development with Native Development Kit by explaining how it works, how to set up your favorite IDE, How to write better codes, how to write Unit Test and more.
To get started with Android Development, you must have solid programming knowledge in Java or Kotlin. In this module, you will learn Android development with Native Code Support (C/C++)
We are proceeding with Android NDK, So we need to have an understanding of Java with C/C++
Do not worry! I will help you get started with Java and C/C++.
How to Get Started?
You need to have Android Studio Installed. but for now, You need to know Java and C++ or C language, that's why you need to have respective IDE installed in your machine.
For Java, I recommend IntelliJ IDEA, which you can download for your machine from here: https://www.jetbrains.com/idea/download/#section=windows
You may need to have Java Development KIT (JDK) installed on your machine. You can download it from here: https://www.oracle.com/java/technologies/javase-downloads.html
You can choose any version. but I recommend Java 8 and Later.
Setting up the Development environment:
Now, you are ready to create your first Java project. Before setup everything, try to follow the steps:
Install The Java Development Kit before installing IntelliJ IDEA. now I am going to show you the installation procedure of JDK installation.
Double Click on the downloaded JDK setup file.
It may show a user account control popup. Hit "Yes".
Then a new interface will be visible to you, like this:
Hit Next Button!
Then a New interface will come again!
Leave it as is and hit the "Next" button.
Then the setup should take some time to load like this. it is generally 20 seconds or longer depending on your computer configuration. Please allow some time, do not interrupt this process.
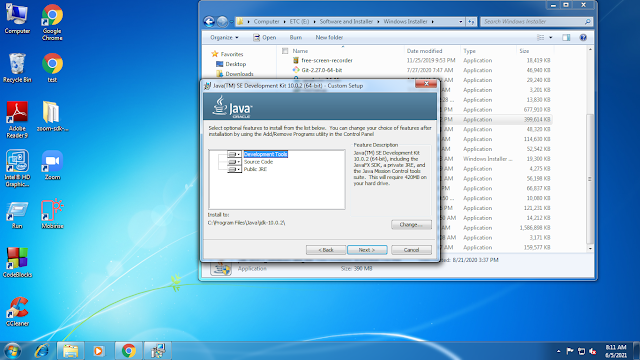
Then, a new interface will visible to you, like this:
Leave it as is and hit the "Next" button.
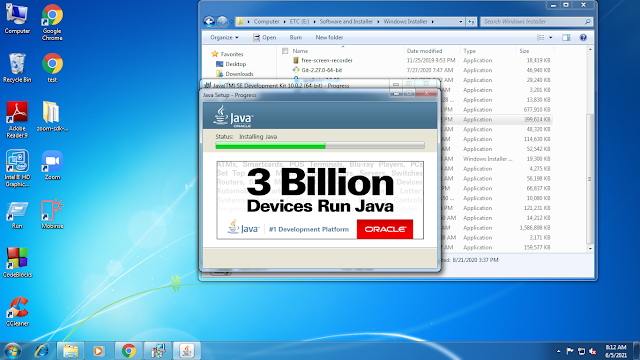
It should start installing, for me it takes generally 45-60 seconds to install JDK. Please allow some time. The installation interface will look like this:
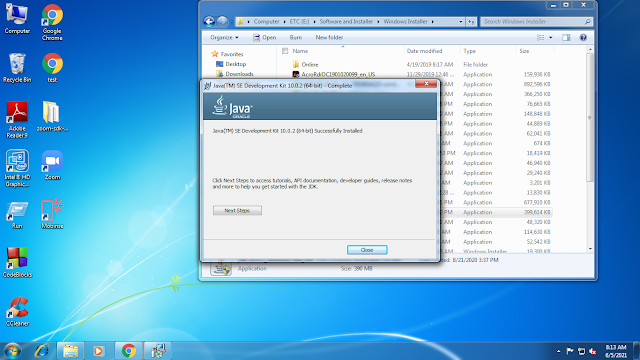
Finally, it should say that installation is succeeded, hit the close button to complete JDK installation.
The interface will look like this:
Great! you have successfully set up the Java Development Kit. Now we are going to set up IntelliJ IDEA!
I can assure you that, you should install the IntelliJ IDEA educational edition, it is free and has all features of the IntelliJ IDEA premium function. There are alternatives available like Netbeans, Eclipse Java IDE, etc.
You already have the IntelliJ IDEA downloaded. now, we are going to set up it! let's start.
Double click on the downloaded setup file. it should pop up the user account control interface. Hit "Yes" to allow execution of this setup file.
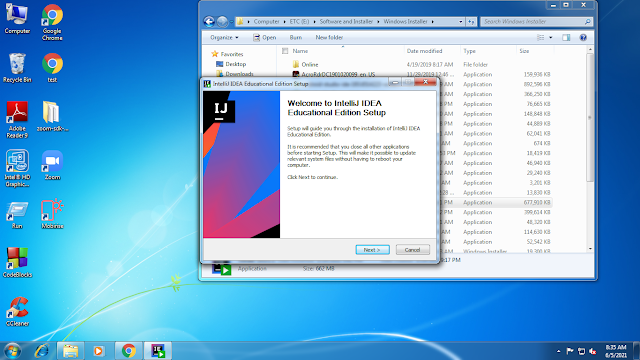
Then a new interface will come. like this:
Hit the "Next" button.
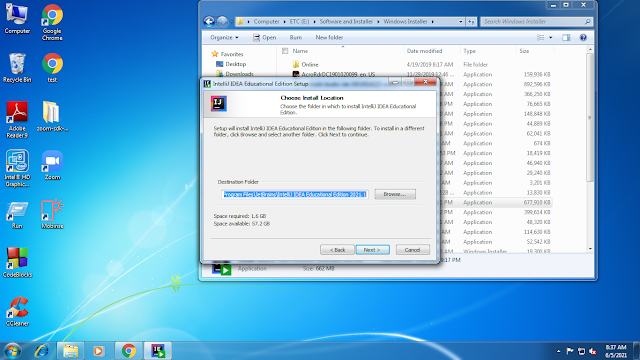
Then an interface will come, like this:
It asks you to choose a directory where the IntelliJ IDEA installation files will take place. You can choose a separate directory other than recommended directory, but I am choosing the "Default" directory suggested by the installation script.
I recommend leaving it as is and hit the "Next" button.
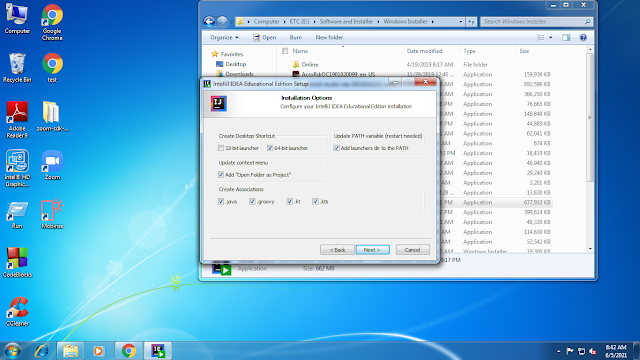
A new interface will come like this:
This step is important. I will help you guide on what configuration is best for you.
If you are running a 64-bit version of Windows, tik 64-bit launcher.
If you went to open a project directly from the Windows Explorer folder, tik Add "Open Folder as Project"
If you went to open files that have an extension with .java .groovy .kt .kts in the IntelliJ IDEA IDE then tik respective check box.
UPDATE PATH VARIABLE means?
If you went running IntelliJ IDEA and its utilities from the command line, tik "Add Launcher dir to the PATH"
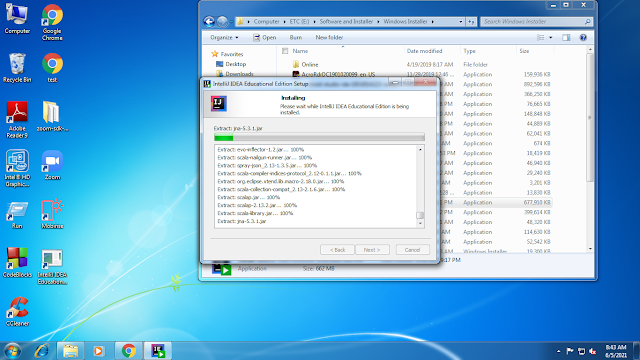
This is useful for learning Command Line Interface and get its access. Finally hit next with this configuration. then next interface will be visible like this:
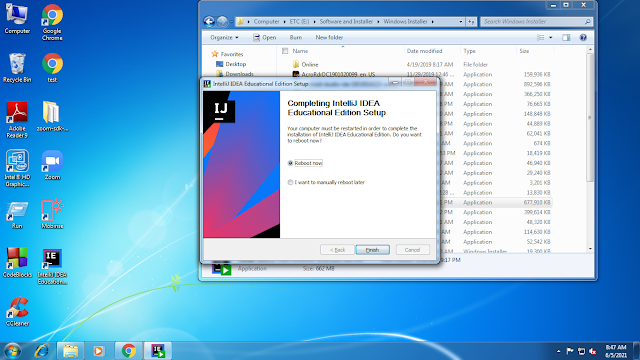
Please sit down and have a rest. it shouldn't take more than two minutes to complete the installation. after all process has been the success it should show next interface like this:
It may ask you to reboot your computer because we have added System variables in Windows, which requires a restart to take effect. if you do not check Add Launcher dir to the PATH it doesn't require a restart, instead, ask you to open the installed IDE.
If you follow my footstep, then choose Reboot new.
Your development environment is now ready for code. Now we are going to write code.
Please refer to this video for creating a new project in the IntelliJ IDEA. after following this video you will be able to create a new Java project and create a new Java File and RUN your first Code!
Video Here:
Your code should be like this:
public class Main {

    public static void main(String[] args){

        System.out.println("Hello World");
        System.out.println("I am a java Programmer");

    }
}
No problem. whatever you have written in this IDE, I will provide clear explanations. do not worry about what you have written in past!
	public class main{


    .................

    }
{
.... this is refer to body/ section
}
This is simple. writing anything inside the body is under its respective owner. If you went to write something outside the class body, you will surely face an error and the compiler will never compile your code. So be careful.
Writing inside the body may show you errors if you write something wrong. So be aware of this.
So we have understood the class and its body. let's get started with the method.
What is a method?
Take this as an example:
    public static void main(String[] args){

        System.out.println("Hello World");
        System.out.println("I am a java Programmer");

    }
Here public refer to keyword where every Java class or interface or virtual machine can have direct access.
static refers to the keyword that also shares public access but this requires no initialization to access! The direct entry I mean. this is useful for various works where one class may hold a memory that usages very often outside this class, and you want to save memory and code for this.
anyway, we will learn about it later on. If you do not want to wait, please feel free to check this link: https://docs.oracle.com/javase/tutorial/java/javaOO/classvars.html
void - which means we never return anything, we are just executing this method.
main - it is the method name. you can use any name. but the main method with static access is mandatory for execute this application.
You can create more method like output() and then call them in the main method like
  main(){


  output();

  }
main(String[] args) - This is method parameter. which we will learn about later. If you can't wait to learn it, please visit here: https://docs.oracle.com/javase/tutorial/java/javaOO/arguments.html This is the main method with parameters for Java Virtual Machine to find and execute starting point for an application.
Look at this implementation:
This means two statements that show output like Hello World && I am a java Programmer respectively. each statement should be finished with a semicolon = ;System.out.println("Hello World"); System.out.println("I am a java Programmer");
Java is case-sensitive. writing System with system is not the same, and different meaning to the compiler. so be aware of what you are writing!
I think that you have enjoyed this journey! Making quality content takes time. Please share this link in your social media account if you liked it!
If you found any unintentional errors, please comment. I will update the content.
Last things to remember. If you have any questions regarding this content, please write a comment, I will try my best to resolve it.





Comments
Post a Comment
Wow nice post!